Phase 3-3·3-4·3-5 — Application부터 Module까지, v2.0 마이그레이션 닫는 날
📚 NestJS + Refine 풀스택 트러블슈팅 시리즈 (63편)
Phase 3-1·3-2가 만든 Repository와 Domain Service 위에 Application(953줄), Controller+DTO(763줄), Module(39줄)을 차례로 얹어 v2.0 번들 기반 학습 시스템을 닫는 단계. UC-06~10과 UC-14~17을 어떻게 코드로 옮겼는지, 인메모리 챌린지 스토어를 왜 일부러 남겼는지, 39줄짜리 모듈 한 장이 왜 끝의 끝인지를 기록한다.
💡 Tip. 바쁜 현대인들을 위한 본문 요약
- Phase 3-3은 UC를 코드로 박는 단계다.
BundleApplicationService가 UC-0610을,17을 맡아 합쳐 953줄이 들어갔다NewRecordChallengeApplicationService가 UC-14- Phase 3-4는 HTTP 표면 만들기. 컨트롤러 두 개에 v2 prefix를 단 엔드포인트 10개를 그렸고, 그 뒤를 받쳐주는 DTO 두 파일이 추가됐다
- Phase 3-5는 39줄.
ApplicationModule에 v2.0 providers / controllers / exports만 더하면 NestJS DI 컨테이너가 알아서 위 모든 객체를 묶어준다- 인메모리 챌린지 스토어는 의도된 미완성이다. “TODO: Move to Redis”를 일부러 남긴 이유는 v2.0의 본질이 “번들 학습”에 있고 챌린지는 부수 흐름이기 때문이다
- 레벨링 모듈은 콘텐츠 3, 4 두 번만 돌린다. 5번에 한 번씩이 아니라 “사전 평가 → 재조정”이라는 두 번의 결정 지점만 잡아주는 게 운영자에게도 더 설명하기 쉽다
🗺️ 이 편의 자리 — Phase 3의 마지막 세 칸
지난 편에서 v2.0 Phase 3-1과 3-2를 닫았다. Repository 인터페이스 204줄과 Prisma 구현체 294줄이 깔렸고, 그 위에 BundleGenerationService 417줄과 LevelingModuleService 208줄이 올라갔다. 거기까지가 “DB가 새 모양인데 코드는 옛 시그니처를 들고 있는” 비대칭을 절반 봉합한 상태였다.
이번 편이 다루는 칸은 그 위 세 개다.
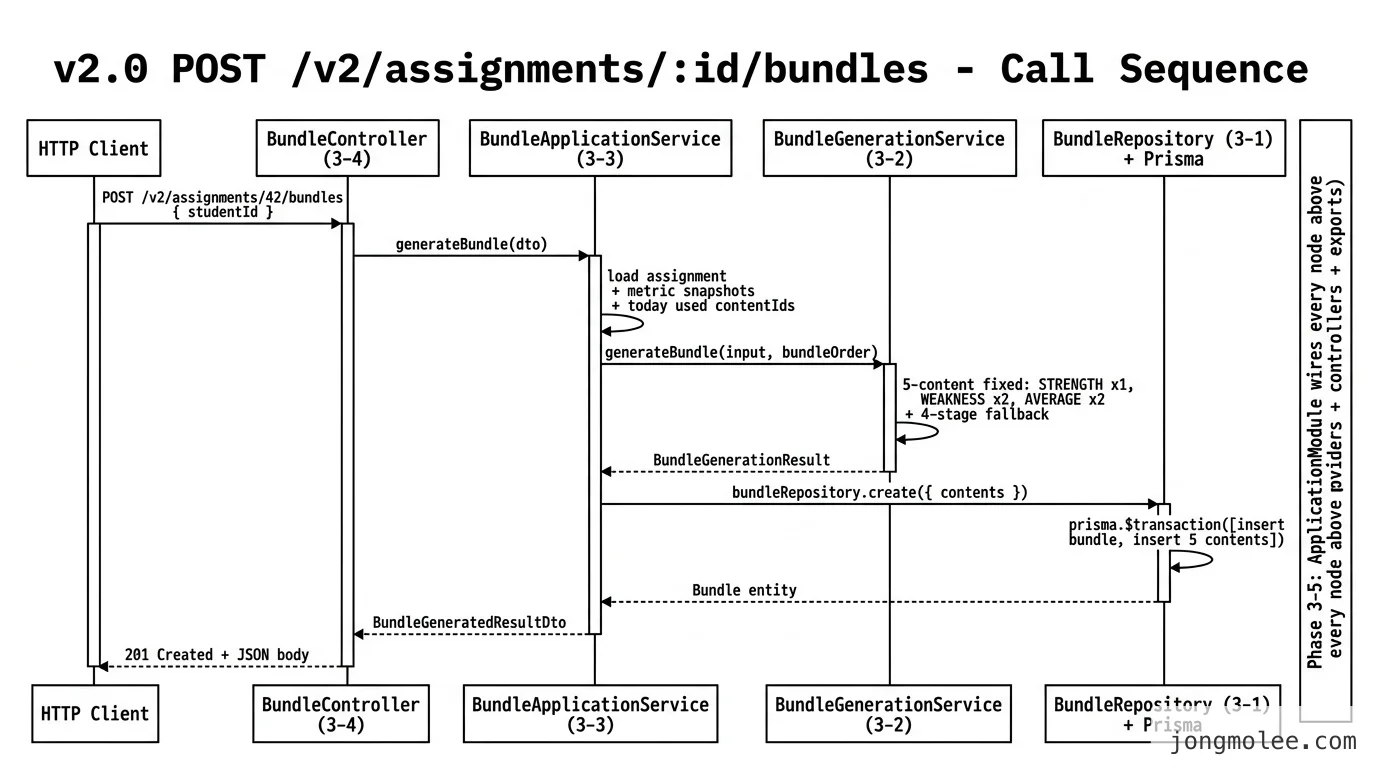
도식에서 가장 왼쪽에 있는 HTTP 클라이언트가 POST /v2/assignments/42/bundles를 한 번 던지면, 그 요청이 컨트롤러 → 애플리케이션 서비스 → 도메인 서비스 → 리포지토리 → Prisma까지 다섯 칸을 지나간다. Phase 3-3·3-4·3-5는 이 길의 위 세 칸을 새로 까는 작업이다.
📌 핵심: 한 요청이 통과해야 할 다섯 칸 중에서 Phase 3-1·3-2에서 아래 두 칸을 깔았고, 이번 편에서 위 세 칸을 깐다. 다 깔리면 v2.0의 첫 엔드포인트가 비로소 “사용 가능한 상태”가 된다.
| Phase | 작업 | 추가 줄 수 | 누구를 호출하나 |
|---|---|---|---|
| 3-3 | Application Services | +953 | Phase 3-2의 Domain Services |
| 3-4 | Controllers + DTOs | +763 | Phase 3-3의 Application Services |
| 3-5 | Module 등록 | +33 / -6 | NestJS DI 컨테이너 (위 네 레이어 전부) |
세 커밋 합쳐 신규 1,755줄 + 수정 39줄. 줄 수만 보면 Phase 3-1·3-2(1,563줄)보다 큰데, 체감 난이도는 오히려 더 가볍다. 아래 두 칸을 인터페이스부터 그려놓은 덕에 위 칸을 짤 때 “이 메서드 시그니처에 맞춰 호출만 하면 된다”가 명확했기 때문이다.
다루는 세 커밋의 한 줄 요약
af26e07 — feat: Phase 3-3 Application Services 구현
- BundleApplicationService (616줄): UC-06 ~ UC-10
- NewRecordChallengeApplicationService (337줄): UC-14 ~ UC-17
총 +953줄

dff0c4c — feat: Phase 3-4 Controller & DTO Layer 구현
- BundleController (167줄) + NewRecordChallengeController (144줄)
- bundle.dto.ts (215줄) + new-record-challenge.dto.ts (152줄)
- BundleApplicationService 보완 (+80줄: getCurrentBundle 등)
- index.ts (5줄)
총 +763줄

1f9f184 — feat: Phase 3-5 Module 등록 완료
- ApplicationModule providers/controllers/exports 갱신
+33 / -6
🔧 Phase 3-3: Application Services — UC를 코드로 박는 단계
BundleApplicationService는 UC-06부터 UC-10까지 5개의 유즈케이스를 담는 클래스다. 5개 메서드의 책임을 한 줄씩 뽑으면 이렇다.
| 메서드 | UC | 한 줄 책임 |
|---|---|---|
generateBundle | UC-06 | 5콘텐츠 번들을 새로 만들어 DB에 저장한다 |
startContent | UC-07 | 콘텐츠 1개의 상태를 IN_PROGRESS로 옮긴다 |
completeContent | UC-08 | 결과를 저장하고 레벨링 모듈을 한 번 돌린다 |
completeBundle | UC-09 | 5콘텐츠 모두 끝났을 때 평균 정확도를 계산해 닫는다 |
completeAssignment | UC-10 | 과제 전체를 닫고 달성도(EXCELLENT/NORMAL/POOR)를 매긴다 |
다섯 메서드를 합쳐 616줄. 클래스 하나에 묶기엔 작지 않은 분량이지만, 다섯 개가 같은 Aggregate(과제 → 번들 → 콘텐츠)에 붙어 있기 때문에 분리하면 오히려 가독성이 떨어진다. v1.x에서 이 다섯 가지 흐름이 다섯 군데 흩어져 있었던 게 v2.0의 통증 중 하나였고, 그 통증의 해소가 이 클래스의 존재 이유다.
generateBundle — 사전 조회 5개, 호출 1개, 저장 1개
async generateBundle(dto: GenerateBundleDto): Promise<BundleGeneratedResultDto> {
  // 1. 과제 조회 (학생 + 기존 번들 같이)
  const assignment = await this.prisma.assignment.findUnique({
    where: { id: BigInt(dto.assignmentId) },
    include: { bundles: true, student: true },
  });
  if (!assignment) throw new NotFoundException('과제를 찾을 수 없습니다.');
  if (!assignment.student.currentLevelId) {
    throw new BadRequestException('학생의 레벨이 배치되지 않았습니다.');
  }

  // 2. 번들 순서 계산
  const bundleOrder = assignment.bundles.length + 1;

  // 3. 학생 지표 스냅샷 조회 (가장 최근 것만)
  const metricSnapshots = await this.prisma.studentMetricSnapshot.findMany({
    where: { studentId: dto.studentId },
    orderBy: { snapshotDate: 'desc' },
    distinct: ['metricCode'],
  });

  // 4. 오늘 출제된 콘텐츠 조회 (킥오프 06:00 기준)
  const todayStart = this.getTodayKickoffTime();
  const todayAttempts = await this.prisma.contentAttempt.findMany({
    where: { studentId: dto.studentId, startedAt: { gte: todayStart } },
    select: { contentId: true },
    distinct: ['contentId'],
  });
  const todayUsedContentIds = todayAttempts.map((a) => a.contentId);

  // 5. Domain Service 호출 — 핵심 결정은 여기서
  const generationResult = await this.bundleGenerationService.generateBundle({
    studentId: dto.studentId,
    assignmentId: BigInt(dto.assignmentId),
    currentLevelId: assignment.student.currentLevelId,
    metricSnapshots: metricSnapshots.map((s) => ({
      metricCode: s.metricCode,
      score: s.score,
    })),
    todayUsedContentIds,
    selectedContentIdsInBundle: [],
  }, bundleOrder);

  // 6. Repository에 저장
  const bundle = await this.bundleRepository.create({
    assignmentId: BigInt(dto.assignmentId),
    bundleOrder,
    contents: generationResult.contents.map((c) => ({ ... })),
  });

  return { bundleId: Number(bundle.id), ... };
}
이 한 메서드를 보면 Application Layer의 책임이 또렷이 보인다. **“바깥 세계(DB)에서 데이터를 그러모아 Domain Service에 던져주고, 결과를 다시 DB에 저장한다”**가 전부다. 어떤 콘텐츠를 고를지, 어떤 폴백을 적용할지 같은 결정은 단 한 줄도 여기서 하지 않는다. 그건 지난 편에서 만든 BundleGenerationService의 일이다.
📌 핵심: Application Service는 “오케스트레이터”다. 결정은 안 하고, 데이터를 모아서 Domain Service에 던지고, 응답을 받아서 Repository에 저장한다. 비즈니스 규칙이 여기 들어오면 그 순간 레이어가 무너진다.
completeContent — 7단계 흐름의 본보기
completeContent는 한 메서드에 단계가 7개 들어가서 가장 길지만, 흐름이 깨끗해서 새로 합류한 사람이 읽어도 따라간다.
async completeContent(dto: CompleteContentDto): Promise<CompleteContentResultDto> {
  // 1. 번들 콘텐츠 조회
  const bundleContent = await this.bundleRepository.findContentById(dto.bundleContentId);
  if (!bundleContent) throw new NotFoundException('번들 콘텐츠를 찾을 수 없습니다.');

  // 2. 상태 확인 — IN_PROGRESS만 완료 가능
  if (bundleContent.status !== BundleContentStatus.IN_PROGRESS) {
    throw new BadRequestException(`완료 가능한 상태가 아닙니다: ${bundleContent.status}`);
  }

  // 3. 콘텐츠 결과 저장
  await this.bundleRepository.updateContent(Number(bundleContent.id), {
    status: BundleContentStatus.COMPLETED,
    accuracyPct: dto.accuracyPct,
    timeSpentMs: dto.timeSpentMs,
    completedAt: new Date(),
  });

  // 4. ContentAttempt 생성 (지표 반영용)
  await this.prisma.contentAttempt.create({
    data: {
      studentId: dto.studentId,
      bundleContentId: bundleContent.id,
      contentId: bundleContent.contentId,
      levelId: bundleContent.adjustedLevelId,
      origin: AttemptOrigin.BUNDLE,
      countsForAdjustment: true,
      accuracyPct: dto.accuracyPct,
      timeSpentMs: dto.timeSpentMs,
      ...
    },
  });

  // 5. Assignment.lastContentCompletedAt 갱신
  const bundle = await this.bundleRepository.findById(Number(bundleContent.bundleId));
  if (bundle) {
    await this.prisma.assignment.update({
      where: { id: bundle.assignmentId },
      data: { lastContentCompletedAt: new Date() },
    });
  }

  // 6. 레벨링 모듈 적용 (콘텐츠 3, 4 완료 시에만)
  let levelingApplied = false;
  let nextContentAdjustedLevelId: number | undefined;
  if (bundle) {
    const levelingResult = await this.applyLevelingModule(
      Number(bundle.id),
      bundleContent.contentOrder,
      dto.accuracyPct,
      bundleContent.originalLevelId,
    );
    levelingApplied = levelingResult.applied;
    nextContentAdjustedLevelId = levelingResult.adjustedLevelId;
  }

  // 7. 번들 완료 확인 (콘텐츠 5 완료 시 자동 호출)
  if (bundleContent.contentOrder === 5 && bundle) {
    await this.completeBundle(Number(bundle.id));
  }

  return { bundleContentId, contentOrder, accuracyPct, status, levelingApplied, nextContentAdjustedLevelId };
}
🔍 단서: 7단계 중 4번(ContentAttempt 생성)이 핵심이다. 번들 안 콘텐츠가 끝났다는 사실을
BundleContent한 곳에만 기록하지 않고, 별도의ContentAttempt테이블에 한 번 더 적는다. 이유: 지표 누계와 레벨링 결정은 “이 학생이 이 콘텐츠를 어떻게 풀었는가”의 시계열 이력에서 나오는데,BundleContent만 보면 ‘왜 이 결정이 났는지’를 거꾸로 추적할 수 없다.
⏰ 킥오프 시간 — “오늘”의 정의를 코드에 박기
generateBundle 4단계의 getTodayKickoffTime()은 한 줄짜리 헬퍼지만 v2.0 운영 정책의 핵심 중 하나다.
private getTodayKickoffTime(): Date {
  const now = new Date();
  const kickoff = new Date(now);
  kickoff.setHours(6, 0, 0, 0); // KST 06:00
  if (now < kickoff) {
    kickoff.setDate(kickoff.getDate() - 1); // 새벽 학습은 어제로 친다
  }
  return kickoff;
}
⚠️ 주의: 자정 기준으로 “오늘”을 잡으면 새벽 학습이 통계에서 분리된다. 새벽 5시에 푼 콘텐츠가 이미 “오늘 출제된 콘텐츠”로 분류돼 다시 출제 후보에서 빠지는 사고가 v1.x 운영 중에 한 번 났다. 06:00을 경계로 잡으면 새벽까지의 학습이 어제 묶음으로 들어가서 “오늘 처음 받는 묶음”의 콘텐츠 풀이 회복된다.
이 한 줄을 메서드로 뽑은 이유는 다른 두 곳에서도 같은 정의를 쓰기 때문이다. “오늘”의 정의가 한 군데에만 살아 있어야 정책이 바뀔 때 한 번만 바꿔도 안전하다.
🎯 레벨링 모듈 트리거 — 왜 콘텐츠 3과 4 두 번만인가
completeContent 6단계에서 호출되는 applyLevelingModule은 콘텐츠 3과 4 완료 시에만 실행된다.
private async applyLevelingModule(
  bundleId: number,
  completedContentOrder: number,
  completedAccuracy: number,
  originalLevelId: number,
): Promise<{ applied: boolean; adjustedLevelId?: number }> {
  // 콘텐츠 1, 2, 5에서는 그냥 빠진다
  if (completedContentOrder !== 3 && completedContentOrder !== 4) {
    return { applied: false };
  }

  // ... (생략) ...

  let levelingResult;
  if (completedContentOrder === 3) {
    // 콘텐츠 1-3 평균 정확도로 콘텐츠 4, 5 레벨 결정
    const content1 = bundle.contents.find((c) => c.contentOrder === 1);
    const content2 = bundle.contents.find((c) => c.contentOrder === 2);
    levelingResult = await this.levelingModuleService.applyAfterContent3({
      content1Accuracy: content1?.accuracyPct || 0,
      content2Accuracy: content2?.accuracyPct || 0,
      content3Accuracy: completedAccuracy,
      currentLevel,
    });
    await this.bundleRepository.updateContentsLevel(bundleId, [4, 5], levelingResult.adjustedLevelId);
  } else {
    // 콘텐츠 4 단독 정확도로 콘텐츠 5 레벨 재조정
    levelingResult = await this.levelingModuleService.applyAfterContent4({
      content4Accuracy: completedAccuracy,
      currentLevel,
    });
    await this.bundleRepository.updateContentsLevel(bundleId, [5], levelingResult.adjustedLevelId);
  }

  this.eventEmitter.emit('leveling.applied', {
    bundleId, originalLevelId,
    adjustedLevelId: levelingResult.adjustedLevelId,
    reason: levelingResult.reason,
    contentOrder: completedContentOrder,
  });

  return { applied: true, adjustedLevelId: levelingResult.adjustedLevelId };
}
다섯 콘텐츠를 푸는 동안 다섯 번 매번 레벨을 만지는 게 아니라, 3번에서 한 번 사전 평가, 4번에서 한 번 재조정. 두 번의 결정 지점만 잡는 이유는 두 가지다.
첫째, 운영자에게 설명 가능한 모델이라야 한다. “왜 콘텐츠 5의 레벨이 콘텐츠 1과 다른가요?”라는 질문에 “콘텐츠 1~3 평균이 95%여서 한 단계 위로 갔어요”가 답이 된다. 매 콘텐츠마다 미세 조정하면 답이 “여러 요인이 작용해서요”로 흐려진다.
둘째, 사용자 체감 안정성. 1, 2 풀고 3 풀자마자 “아 이거 어려워졌네”가 한 번. 4 풀고 5에서 한 번. 두 번이면 충분하고, 세 번 이상은 불안정하게 느껴진다. 운영 데이터로도 두 번이 균형이 잘 맞았다.
📌 핵심: 트리거 시점은 코드 한 줄(
completedContentOrder !== 3 && !== 4)이지만, 이 한 줄에 “운영자에게 설명 가능 + 사용자 체감 안정”이라는 두 정책이 박혀 있다. 이런 결정은 코드에 박기 전에 문서로 남겨야 6개월 뒤의 자신이 “왜 3과 4지?”를 다시 안 묻는다.
🔔 EventEmitter2 — 부수효과를 본 흐름에서 떼어내기
applyLevelingModule 마지막 줄, completeBundle 끝, bundle.completed 등에서 일관되게 eventEmitter.emit이 호출된다.
// leveling.applied
this.eventEmitter.emit('leveling.applied', {
  bundleId, originalLevelId, adjustedLevelId, reason, contentOrder,
});

// bundle.completed
this.eventEmitter.emit('bundle.completed', {
  bundleId, avgAccuracyPct,
});
이 한 줄들이 있는 이유는 단 하나, Application은 “이게 일어났다”만 알리고, “그래서 뭘 할지”는 모르는 척하기 위해서다. 레벨이 조정되면 모니터링 대시보드에 알림을 쏘고 싶고, 번들이 완료되면 학생 지표를 갱신하고 싶다. 이걸 같은 메서드 안에서 호출하면 “번들 완료 메서드가 알림 모듈 코드를 포함하는” 의존이 생긴다.
💡 인사이트: v1.x에서는 이 부분이 직접 호출이었다.
completeBundle안에서metricAggregationService.updateStudentMetrics(...)를 직접 부르고, 알림도 같은 자리에서 쐈다. 그러다 보니 번들 완료 한 번 호출이 8개 모듈을 깨우는 큰 바위가 됐고, 메트릭 갱신이 실패하면 번들 완료 자체가 롤백되는 사고로 이어졌다. 부수효과는 이벤트로 빼내고, 본 흐름은 본 흐름의 책임만 진다.
이벤트 핸들러는 별도 파일에 모여 있고, 이 시리즈에서는 별도 편으로 다룰 예정이다. 지금 이 자리에서는 “Application은 한 발 앞에서 멈춘다”만 짚어두면 충분하다.
🌐 Phase 3-4: Controller & DTO — HTTP 표면 10개 그리기
Phase 3-4는 위에서 만든 두 Application Service를 HTTP에 노출시키는 단계다. 컨트롤러 2개, DTO 파일 2개. 합쳐 763줄.
BundleController — v2 prefix 6개 엔드포인트
@Controller()
export class BundleController {
  constructor(private readonly bundleService: BundleApplicationService) {}

  @Post('v2/assignments/:assignmentId/bundles')
  @HttpCode(HttpStatus.CREATED)
  async generateBundle(
    @Param('assignmentId', ParseIntPipe) assignmentId: number,
    @Body() dto: Omit<GenerateBundleRequestDto, 'assignmentId'>,
  ): Promise<BundleGeneratedResultDto> {
    return this.bundleService.generateBundle({ ...dto, assignmentId });
  }

  @Post('v2/bundles/:bundleId/contents/:contentOrder/start')
  @HttpCode(HttpStatus.OK)
  async startContent(
    @Param('bundleId', ParseIntPipe) bundleId: number,
    @Param('contentOrder', ParseIntPipe) contentOrder: number,
    @Body() dto: { studentId: string },
  ): Promise<StartContentResultDto> {
    return this.bundleService.startContent({ bundleId, contentOrder, studentId: dto.studentId });
  }

  // ... completeContent, completeAssignment, getCurrentBundle, getBundlesByAssignment ...
}
여기서 눈에 띄는 패턴이 두 개 있다.
패턴 1. URL Param과 Body의 분리 — Omit<DTO, 'param'>
@Body() dto: Omit<GenerateBundleRequestDto, 'assignmentId'>,assignmentId는 URL의 path parameter로 받고, body에서는 같은 필드를 타입에서 빼버린다. 그렇지 않으면 클라이언트가 path와 body 양쪽에 assignmentId를 보낼 수 있고, 두 값이 다르면 어느 쪽이 진짜인지 명확하지 않다. 소스가 하나뿐이라야 디버깅이 안 어그러진다.
⚠️ 주의:
Omit을 빼먹고@Body() dto: GenerateBundleRequestDto로 그냥 받으면,dto.assignmentId와assignmentId두 변수가 살아남는다. 코드 리뷰에서 “둘 중 어느 게 먼저인가요?”가 나오면 이미 진 게임이다.
패턴 2. @HttpCode 명시
@Post('v2/assignments/:assignmentId/bundles')
@HttpCode(HttpStatus.CREATED) // 201, 기본은 201이지만 명시한다

@Post('v2/bundles/:bundleId/contents/:contentOrder/start')
@HttpCode(HttpStatus.OK) // 200 — 사실 POST의 기본은 201, 명시 필요
NestJS는 @Post 기본 응답이 201이다. start처럼 “리소스가 새로 생기지 않는 POST”는 200을 명시해줘야 클라이언트가 “이건 생성 아니구나”를 정확히 받는다. 암묵적 디폴트에 의존하지 않는다.
DTO 파일 — Swagger 문서까지 한 번에
// bundle.dto.ts (215줄)
export class GenerateBundleRequestDto {
  @ApiProperty({ description: '과제 ID' })
  @IsInt()
  assignmentId!: number;

  @ApiProperty({ description: '학생 ID' })
  @IsString()
  studentId!: string;
}

export class CompleteContentRequestDto {
  @ApiProperty()
  @IsInt()
  bundleContentId!: number;

  @ApiProperty()
  @IsString()
  studentId!: string;

  @ApiProperty({ description: '정확도 (0~100)' })
  @IsNumber()
  @Min(0)
  @Max(100)
  accuracyPct!: number;

  // ...
}
DTO를 class로 만들고 class-validator + @nestjs/swagger를 같이 거는 건 devlog-25 SC-A 시즌에 한 번 호되게 당한 뒤로 시리즈의 표준이 됐다. interface는 런타임에 사라져서 검증도 Swagger 문서도 못 만든다. v2.0의 DTO는 처음부터 class로 만들었다.
🧩 Phase 3-5: Module 등록 — 39줄로 닫는 v2.0
Phase 3-5는 진짜 작다. ApplicationModule 한 파일에 33줄 추가, 6줄 수정. 끝.
// Domain Services (v2.0)
import { BundleGenerationService } from '../domain/services/bundle-generation.service';
import { LevelingModuleService } from '../domain/services/leveling-module.service';

// Application Services (v2.0)
import { BundleApplicationService } from './services/bundle.application.service';
import { NewRecordChallengeApplicationService } from './services/new-record-challenge.application.service';

// Controllers (v2.0)
import { BundleController } from './controllers/bundle.controller';
import { NewRecordChallengeController } from './controllers/new-record-challenge.controller';

@Module({
  imports: [
    DomainModule,
    ScheduleModule.forRoot(),
  ],
  controllers: [
    // v1.x Controllers
    StudentOnboardingController,
    AssignmentController,
    LevelAdjustmentController,
    AttendanceController,
    BatchProcessController,
    FreeLearningController,
    // v2.0 Controllers
    BundleController,
    NewRecordChallengeController,
  ],
  providers: [
    // Domain Services (v1.x) ...
    // Domain Services (v2.0)
    BundleGenerationService,
    LevelingModuleService,
    // Application Services (v1.x) ...
    // Application Services (v2.0)
    BundleApplicationService,
    NewRecordChallengeApplicationService,
  ],
  exports: [
    // v1.x Application Services ...
    // v2.0 Application Services
    BundleApplicationService,
    NewRecordChallengeApplicationService,
  ],
})
export class ApplicationModule {}
📌 핵심: 39줄짜리 모듈 하나가 위 1,716줄을 묶어서 NestJS의 DI 컨테이너에 넘긴다.
BundleController가BundleApplicationService를,BundleApplicationService가BundleGenerationService와BundleRepository를 받는 의존성 그래프가 이 한 파일의 providers/controllers/exports 배열에 적힌 순서대로 만들어진다.
// v1.x / // v2.0 주석은 시각적 자산이다
위 코드의 import 블록과 배열 항목에 // v1.x / // v2.0 구분 주석을 일관되게 박아둔 건 의도가 있다. 마이그레이션이 끝난 뒤에도 한참 동안 v1과 v2 컨트롤러가 공존하기 때문에, 새 합류자가 ApplicationModule을 열었을 때 “어디까지가 옛날 거고 어디부터가 신규인지”를 한 줄에 알 수 있어야 한다. 한참 뒤 v1을 들어낼 때도 이 주석이 가위질 가이드가 된다.
exports에 v2.0 서비스를 넣은 이유
exports: [
  // v2.0 Application Services
  BundleApplicationService,
  NewRecordChallengeApplicationService,
],exports는 다른 모듈에서 이 모듈의 service를 주입 받을 수 있게 공개하는 배열이다. 당장 v2.0 안에서만 쓰는데도 export에 넣은 이유는, 배치 모듈이 BundleApplicationService.completeAssignment를 호출할 일이 곧 생기기 때문이다. “타이머 만료된 과제 자동 종료” 같은 cron 작업이 다음 Phase에서 들어오는데, 그 때 export 누락으로 한 번 더 깨지는 걸 미리 막는다.
🧪 인메모리 챌린지 스토어 — 의도된 미완성을 남기는 법
NewRecordChallengeApplicationService의 머리에는 이런 코드가 있다.
// In-memory Challenge Store (TODO: Move to Redis or DB)
interface ActiveChallenge {
  id: number;
  studentId: string;
  contentId: number;
  levelId: number;
  currentBestAccuracyPct: number;
  startedAt: Date;
}

@Injectable()
export class NewRecordChallengeApplicationService {
  // In-memory challenge store (TODO: Move to Redis or DB)
  private readonly activeChallenges = new Map<number, ActiveChallenge>();
  private challengeIdCounter = 1;
  // ...
}
startChallenge 호출 시 challengeIdCounter++로 ID를 발급하고 메모리 Map에 넣는다. completeChallenge에서 그 ID로 꺼내 쓴다. 서버 재시작하면 진행 중 챌린지는 다 날아간다.
이 결정은 일부러 남긴 미완성이다.
| 선택지 | 장점 | 단점 |
|---|---|---|
| 인메모리 Map (선택) | 1시간이면 끝 / Redis 의존성 없음 | 재시작 시 진행 중 챌린지 소실 |
| Redis | 영속성 + 만료 자동 | 인프라 추가 / 키 설계 / 직렬화 |
| DB 테이블 | 영속성 + 조회 가능 | 스키마 추가 + 마이그레이션 1회 |
v2.0의 본질은 번들 학습 시스템이다. 신기록 도전은 부수 흐름이고, 사용자가 “도전 시작 → 한 콘텐츠 풀고 → 완료”를 보통 5분 안에 끝낸다. 5분 안에 서버가 죽을 확률을 받아들이고, 남는 시간을 v2.0 본체 검증에 썼다. TODO 주석으로 남은 부채는 다음 Phase에서 Redis로 옮기면서 갚는다.
💡 인사이트: 부채를 안 만드는 게 최선이지만, “이건 일부러 남긴 부채다”라고 코드에 박아두는 것이 두 번째다. 다른 사람이 “이거 왜 인메모리예요?”라고 물을 때 답이 한 줄로 끝난다. TODO 없이 남은 인메모리는 그냥 잊혀진 사고이고, TODO가 박힌 인메모리는 다음 작업의 약속이다.
📋 정리 — 핵심 요약
| 항목 | Phase 3-3 | Phase 3-4 | Phase 3-5 |
|---|---|---|---|
| 줄 수 | +953 | +763 | +33 / -6 |
| 핵심 산출물 | 2개 Application Service (UC-06 | 2 Controller + 2 DTO 파일 (10 endpoints) | ApplicationModule providers/controllers/exports 갱신 |
| 책임 한 줄 | ”데이터를 모아 Domain Service에 던지고 결과를 저장" | "HTTP를 Application Service 호출로 번역" | "위 모든 것을 NestJS DI 컨테이너에 묶음” |
| 의존 방향 | Domain ← Application | Application ← Controller | 모두 ← Module |
v2.0 Phase 3 전체를 한 문장으로 압축하면 이렇다. 새 DB 구조에 맞춰 Repository → Domain Service → Application Service → Controller → Module 다섯 칸을 위에서 아래로(또는 아래에서 위로) 한 칸씩 채웠다. 각 칸은 자기 위/아래 칸과만 대화하고, 결정과 오케스트레이션이 분리됐다.
| 안티패턴 | 권장 패턴 |
|---|---|
| ❌ Application Service에 비즈니스 규칙 박기 | ✅ Application은 오케스트레이션만, 결정은 Domain Service |
| ❌ Controller가 Repository를 직접 호출 | ✅ Controller → Application → Domain → Repository 단방향 |
| ❌ DTO를 interface로 작성 | ✅ class + class-validator + @ApiProperty |
| ❌ POST 응답 코드 암묵 의존 | ✅ @HttpCode(HttpStatus.OK / CREATED) 명시 |
| ❌ URL Param + Body 같은 필드 중복 | ✅ @Body() dto: Omit<DTO, 'paramKey'> |
| ❌ “오늘”의 정의를 호출자마다 작성 | ✅ getTodayKickoffTime() 한 군데에만 |
| ❌ TODO 없이 인메모리로 살짝 끼워두기 | ✅ “TODO: Move to Redis”를 주석으로 박아 부채를 약속으로 |
다음 편에서는 Phase 3 전체를 닫은 직후 pnpm build가 0 errors를 띄우는 순간과, 그 직후 v2.1로 넘어가며 DDD 문서를 전면 재작성한 이야기를 다룬다. 코드보다 문서가 더 길어진 이유가 핵심이다.
📚 NestJS + Refine 풀스택 트러블슈팅 시리즈 (63편)
- 1. 왜 NestJS + Prisma를 선택했나 — B2B SaaS 백엔드 기술 선택기
- 2. 도메인 모델링 첫날 — B2B SaaS의 핵심 엔티티 정의하기
- 3. 27개 테이블의 탄생 — Prisma 스키마 설계기
- 4. 권한 매트릭스 — Admin/운영자/사용자 3역할 설계
- 5. BigInt PK에서 Int PK로 — 첫 번째 스키마 리팩토링
- 6. Seed 데이터의 함정 — FK 삭제 순서 삽질기
- 7. DDD를 도입하기로 했다 — Repository/Domain/Application 3계층
- 8. 인터페이스 구현체로 바꾸는 날 — NestJS DI와 TypeScript의 간극
- 9. 단위 테스트 인프라 구축 — Jest 설정부터 Mock까지
- 10. E2E 테스트와 Cloud SQL의 고난 — 4/8 passing에서 8/8까지
- 11. REST API 첫 구현 — 6개 Controller, 21개 엔드포인트 완성
- 12. v1.0 완성, 그리고 갈아엎기로 결심한 날
- 13. 번들 구조를 통째로 바꿔야 했던 이유
- 14. Phase 1 문서 정비 — Use Case를 번들 기반으로 다시 쓰다
- 15. Phase 2 스키마 마이그레이션 — 데이터 안 날리고 구조 바꾸기
- 16. Phase 3-1·3-2 — Repository와 Domain 서비스로 36개 빌드 에러 잡기
- 17. Phase 3-3·3-4·3-5 — Application부터 Module까지, v2.0 마이그레이션 닫는 날
- 18. 코드를 박은 다음 날 — 4,658줄 DDD 문서를 24분 사이에 다시 쓴 하루
- 19. v2.1 Domain Layer — 도메인 서비스 1,682줄을 한 커밋에 박은 날의 설계 철학
- 20. v3.0 Application Layer 재작성 — 도메인 서비스 위에 얇은 막을 한 Phase에 박은 날
- 21. 갈아엎고 80일 — v2.0 마이그레이션 8편 메타 회고
- 22. 1인 다역으로 5일 만에 90% — Admin Portal MVP를 끌어올린 토글 한 줄
- 23. Mock에선 되던 게 REST에선 안 됐다 — 응답 포맷 한 칸 차이가 만든 하루
- 24. CORS는 됐다 — PATCH만 빼고. allowedHeaders 한 줄과 Vite 프록시의 소문자 메서드
- 25. 멀티테넌트 누수 — tenantId 3계층 강제
- 26. Prisma 정책 싱글톤 — zod superRefine 임계값 가드
- 27. 멀티테넌트 쓰기 가드 — body.tenantId 차단과 집계 일관성
- 28. 두 번째 점검은 합류 지점이었다 — Admin Portal 2차에서 한 사이클에 잡힌 FE-BE 연동 버그 11건
- 29. Prisma 그래프 스키마 — 선형 레벨을 DAG로 옮긴 4가지 결정
- 30. 교육과정 구조 리팩토링 — 3필드 분리와 폴백 결정기
- 31. 배치고사 MVP — 자동 레벨 배치를 걷어내고 5지표 측정만 남기다
- 32. JWT Guard 적용 — request.user undefined부터 jwt malformed까지
- 33. 디버깅용 운영 API 7개 — Unity 만료 테스트 30분 대기를 0초로
- 34. NestJS Swagger 일괄 적용 — 35개 컨트롤러 + DTO 22개
- 35. Unity ↔ 웹 PostMessage 브릿지 설계기
- 36. Vuplex 브릿지 초기화 타이밍 — 첫 메시지가 증발한 이유
- 37. 콘텐츠 브릿지 10종 통합 완료 — 같은 규격으로 묶기
- 38. 지표 누계 시스템 — TOP5 순위를 INSERT 전용 스냅샷으로 굳히기
- 39. 킥오프 배치 첫 구현 — 매시 전체 EXPIRED 사고와 Winston 도입
- 40. 혼자 여러 역할로 QA 1차 — 브랜치 미동기화와 잔존 토큰의 함정
- 41. 타이머가 NaN:NaN으로 떴다 — Bundle API 응답 누락 필드와 비어 있는 콘텐츠 후보
- 42. 1인 개발 QA 5라운드 — 타이머·시드·스키마로 옮긴 버그들
- 43. Unity Lobby + 배치고사 씬 통합 — 두 클라이언트가 같은 회원을 보는 첫 빌드
- 44. 배치고사 MVP 후속 — 명세를 코드로 옮기고 레거시 571줄을 일괄 삭제하다
- 45. Problem 종속 끊기 — 1,891개 마이그레이션과 단위 테스트 38건
- 46. NestJS 권한 가드 — 목록은 막고 상세는 뚫린 날
- 47. 콘텐츠 후보 선택 3차 최적화 — 단일 쿼리로 옮기기
- 48. 재화 시스템 첫 머지 — 코인 지갑과 거래 원장(Wallet API)
- 49. 회원 레포트 5탭 API 설계 — 인사이트 3파트 구조
- 50. 보호자 외부 뷰어 대시보드 — 모바일 앱·초대 토큰 회원가입
- 51. 외부 뷰어 리포트 v1→v2 토큰 전환 — 가장 길었던 하루
- 52. 외부 뷰어 리포트 인사이트 — 활동 데이터를 자연어로 바꾸기
- 53. Framer Motion whileInView — 일부 카드만 안 뜨던 날
- 54. 외부 뷰어 리포트 4탭 N+1 — 14초 응답을 2초로
- 55. Cloud SQL 리전 트랩 — US→Taiwan 71% 트러블슈팅
- 56. QR 배치고사 + Firebase Hosting 멀티 사이트 배포
- 57. 1,974줄 풀 백업 — 1인 개발에서 상태 관리하는 법
- 58. 주간 출석 KST 타임존 — 월요일이 사라진 트러블슈팅
- 59. 연락처 포맷 통일 — 저장은 숫자만, 표시는 하이픈
- 60. react-hook-form + Zod 폼 표준 정착기
- 61. Soft Delete 구현 — deletedAt 한 컬럼이 닿은 27곳의 설계
- 62. 교육과정 자동 승급의 늪 — 도메인 버그 3 건 트러블슈팅
- 63. 교육과정 도메인 BE 완성과 같은 날 핫픽스 7 건 — NestJS @Cron 2 중 실행 묶음